Precautions for use
Precautions for use1. Car assembly2. Development environment setupMDK-ARM(Keil uVision5)STM32CubeMX3. Program downloadNotes on serial port burning program4. Engineering experience and transplantationEngineering experienceProject transplantation5. Development board-car tutorialTutorials and code instructions
Here are some statistics and reminders on frequently asked questions!
1. Car assembly
If you only purchase a development board, you can ignore the assembly issue;
If you purchased the car package, you can install it according to the pictures in the video or tutorial!
2. Development environment setup
The tutorial uses STM32CubeIDE. Users can only read the [4. STM32CubeIDE Installation-Usage] tutorial. The installation tutorials for other software are for the comprehensiveness and completeness of the tutorial!
MDK-ARM(Keil uVision5)
MDK-ARM is a paid software. We will only introduce the installation here. As for registration and activation, you need to solve it yourself!
STM32CubeMX
STM32CubeMX is a graphical configuration interface for initializing code and peripheral configuration.
Some users prefer to use the MDK + STM32CubeMX development environment, but we will not provide corresponding technical support;We use STM32CubeIDE software throughout the tutorial.
3. Program download
The STM32 development board car supports ST-Link and serial port programming procedures, but for users who are using STM32CubeIDE and ST-Link for the first time, it is recommended to use a Type-C data cable for the serial port programming procedure!
Notes on serial port burning program
There are two Type-C interfaces on the STM32 development board: one is the serial port burning (Burn) interface, and the other is the USB communication (STM32 USB) interface; when burning the program, the interface used is the serial port burning (Burn) interface. interface.
When using the serial port burning program (FlyMcu), you need to connect the Type-C data cable to the computer first, and then open the burning program, otherwise it will not be recognized (or click the search serial port option in the software after inserting the data cable);
When there are multiple serial port devices, you can enter the device manager to distinguish the serial number corresponding to the STM32 development board car (plug and unplug the data cable to observe the device number that disappears and appears);
The serial port burning options must be consistent with the burning pictures in the burning [6. Program download and simulation] tutorial;
Common situations of burning failure:
Wrong selection of serial device
Entering BootLoader option setting error
The serial port is occupied by other peripherals -······
4. Engineering experience and transplantation
Engineering experience
For those who are coming into contact with our products for the first time, it is recommended to directly download the source code program to experience the functions.
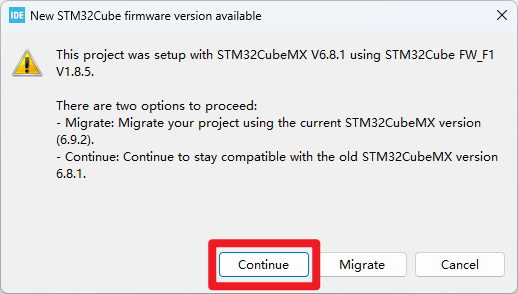
The higher version of STM32CubeIDE is compatible with the lower version. When the versions of the STM32CubeMX graphical configuration interface are inconsistent, click the "Continue" option to configure.
Project transplantation
Project transplantation is something that most DIY users will be involved in, but it requires certain development capabilities. The tutorial provided only mentions simple project transplantation!
Precautions:
If an error occurs when a header file is missing when transplanting a project by yourself, priority should be given to the header file and source file path:
Each folder of the header file needs to be included;
The source file only needs to contain the outer folder.
xxxxxxxxxxMost of our routines provide interface functions for users to call directly. As for the transplantation project, we will not provide too much technical support and it is part of our own development.
5. Development board-car tutorial
For the development board and smart car tutorials, it is recommended to download our project source code first and confirm that the functions are normal before proceeding with your own development!
Frequently Asked Questions Self-Check:
For the development board that does not respond after downloading the program: You can try to burn the program a few more times and press the Reset button after burning the program to restart the development board program.
For abnormal functions of [5. Smart Car Experiment], priority is given to detecting hardware problems with each peripheral:
xxxxxxxxxxFor example: [5. Smart car experiment: infrared remote control] abnormal functionDownload the [4. Development Board Development Course: Infrared Remote Control] code by yourself to test whether the key value of the infrared remote control printed on the serial port of the car is normal.
Tutorials and code instructions
The tutorial analyzes the common HAL library and LL library functions used in the project source code, and does not analyze all the initialization functions automatically generated by STM32CubeMX.
xxxxxxxxxxFiles that require a summary of HAL\LL library functions can be found according to the path in the tutorial.
If there is a discrepancy between the tutorial and the code, the project source code shall prevail. If you find any problems, you can report them to technical customer service in the technical communication group!