2. Color recognition
2. Color recognition2.1. Introduction to HSV color space:2.2. Conversion of three color spaces (gray BGR HSV):2.3. Experimental results
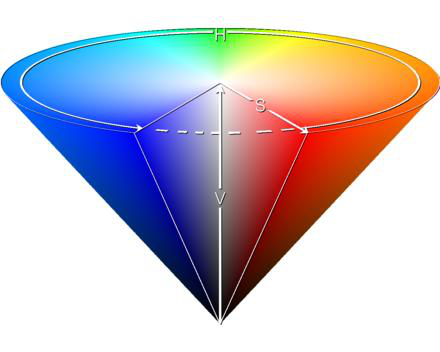
2.1. Introduction to HSV color space:
RGB color space is the most familiar color space, that is, the three-primary color space. Any color can be mixed from these three colors. However, the effective processing of color space images is generally carried out in HSV space. HSV (hue, saturation, brightness value) is a color space created based on the intuitive characteristics of color, also known as the hexagonal pyramid model.
Why choose HSV space instead of RGB space? For images, it is feasible to identify the corresponding color in RGB space, HSV space or other color spaces. The reason for choosing HSV is that the hue represented by H can basically determine a certain color, and then combined with the saturation and brightness information to judge whether it is greater than a certain threshold. RGB is composed of three components, and the contribution ratio of each component needs to be judged. That is, the recognition range of HSV space is wider and more convenient.
The following figure is the HSV color space model
2.2. Conversion of three color spaces (gray BGR HSV):
There are more than 150 color space conversion methods in OpenCV, but we often use only two, namely BGR->Gray and BGR->HSV. Note that Gray and HSV cannot be converted to each other. Color space conversion: cv2.cvtColor(input_image, flag)
BGR->Gray: flag is cv2.COLOR_BGR2GRAY
BGR->HSV: flag is cv2.COLOR_BGR2HSV
Value range of HSV color space in OpenCV:
H [0, 179] S [0, 255] V [0, 255]
The following figure shows the value range of common colors:
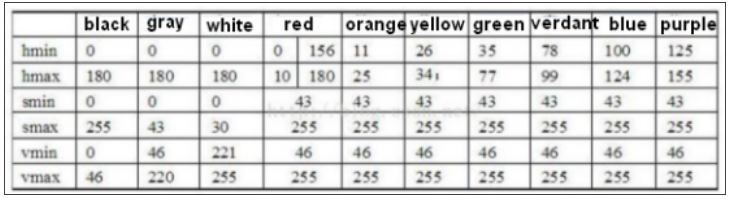
Based on the above range, our goal is to identify whether it is the color range we set, and replace this color with white first, replace the non-this color with black, and finally replace the white part with the original image.
2.3. Experimental results
Source code path:
/home/pi/project_demo/07.AI_Visual_Recognition/02.Color_Recog/02_color_detection.ipynb
x#bgr8转jpeg格式 bgr8 to jpeg formatimport enumimport cv2
def bgr8_to_jpeg(value, quality=75): return bytes(cv2.imencode('.jpg', value)[1])xxxxxxxxxx#显示摄像头组件 Display camera componentsimport cv2import traitletsimport ipywidgets.widgets as widgetsfrom IPython.display import displayimport time# 线程功能操作库 Thread function operation libraryimport threadingimport inspectimport ctypes
image_widget = widgets.Image(format='jpeg', width=640, height=480)display(image_widget)xxxxxxxxxxdef _async_raise(tid, exctype): """raises the exception, performs cleanup if needed""" tid = ctypes.c_long(tid) if not inspect.isclass(exctype): exctype = type(exctype) res = ctypes.pythonapi.PyThreadState_SetAsyncExc(tid, ctypes.py_object(exctype)) if res == 0: raise ValueError("invalid thread id") elif res != 1: # """if it returns a number greater than one, you're in trouble, # and you should call it again with exc=NULL to revert the effect""" ctypes.pythonapi.PyThreadState_SetAsyncExc(tid, None) def stop_thread(thread): _async_raise(thread.ident, SystemExit)xxxxxxxxxximage = cv2.VideoCapture(0) #打开摄像头/dev/video0 Open the camera /dev/video0image.set(3, 320)image.set(4, 240)image.set(5, 30) #设置帧率 Setting the frame rate# image.set(cv2.CAP_PROP_FOURCC, cv2.VideoWriter.fourcc('M', 'J', 'P', 'G'))image.set(cv2.CAP_PROP_BRIGHTNESS, 0) #设置亮度 -64 - 64 0.0 Set Brightness -64 - 64 0.0image.set(cv2.CAP_PROP_CONTRAST, 2.0) #设置对比度 -64 - 64 2.0 Set Contrast -64 - 64 2.0image.set(cv2.CAP_PROP_EXPOSURE, 156.0) #设置曝光值 1.0 - 5000 156.0 Set the exposure value 1.0 - 5000 156.0ret, frame = image.read()
#CSI摄像头打开方式 CSI camera opening method# from picamera2 import Picamera2, Preview# import libcamera# picam2 = Picamera2() # camera_config = picam2.create_preview_configuration(main={"format":'RGB888',"size":(320,240)})# camera_config["transform"] = libcamera.Transform(hflip=1, vflip=1)# picam2.configure(camera_config) # picam2.start() # frame = picam2.capture_array()image_widget.value = bgr8_to_jpeg(frame)xxxxxxxxxximport numpy as np# 默认选择红色的,想识别其他请注释下面红色区间代码,放开后面其他区间代码段 The red one is selected by default. If you want to identify other codes, please comment the red code section below and release the other code sections below.# 红色区域 Red Zoneglobal color_lowercolor_lower = np.array([0, 43, 46])global color_uppercolor_upper = np.array([10, 255, 255])# #绿色区间 Green Zone# color_lower = np.array([35, 43, 46])# color_upper = np.array([77, 255, 255])
# #蓝色区间 Blue Zone# color_lower=np.array([100, 43, 46])# color_upper = np.array([124, 255, 255])
# #黄色区间 Yellow Zone# color_lower = np.array([26, 43, 46])# color_upper = np.array([34, 255, 255])
# #橙色区间 Orange Zone# color_lower = np.array([11, 43, 46])# color_upper = np.array([25, 255, 255])xxxxxxxxxxdef Color_Recongnize(): t_start = time.time() fps = 0 while True: ret, frame = image.read() #USB摄像头 USB Camera #frame = picam2.capture_array() #CSI摄像头 CSI Camera frame = cv2.resize(frame, (320, 240)) frame_ = cv2.GaussianBlur(frame,(5,5),0) hsv = cv2.cvtColor(frame,cv2.COLOR_BGR2HSV) mask = cv2.inRange(hsv,color_lower,color_upper) mask = cv2.erode(mask,None,iterations=2) mask = cv2.dilate(mask,None,iterations=2) mask = cv2.GaussianBlur(mask,(5,5),0) cnts = cv2.findContours(mask.copy(),cv2.RETR_EXTERNAL,cv2.CHAIN_APPROX_SIMPLE)[-2] if len(cnts) > 0: cnt = max (cnts, key = cv2.contourArea) (color_x,color_y),color_radius = cv2.minEnclosingCircle(cnt) if color_radius > 10: # 将检测到的颜色用原形线圈标记出来 Mark the detected color with a prototype circle cv2.circle(frame,(int(color_x),int(color_y)),int(color_radius),(255,0,255),2) # Proportion-Integration-Differentiation fps = fps + 1 mfps = fps / (time.time() - t_start) cv2.putText(frame, "FPS " + str(int(mfps)), (40,40), cv2.FONT_HERSHEY_SIMPLEX, 0.8, (0,255,255), 3) # 实时传回图像数据进行显示 Real-time image data transmission for display image_widget.value = bgr8_to_jpeg(frame) # print(g_mode)
xxxxxxxxxxthread1 = threading.Thread(target=Color_Recongnize)thread1.daemon=Truethread1.start()xxxxxxxxxxstop_thread(thread1)image.release() #USB摄像头 USB Camera #使用完成对象记住释放掉对象,不然下一个程序使用这个对象模块会被占用,导致无法使用 Remember to release the object after using it, otherwise the object module will be occupied by the next program, making it unusable.
#CSI摄像头 CSI Camera# picam2.stop()# picam2.close()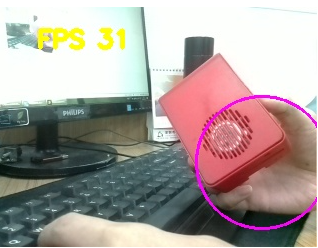
This is the effect of using the default HSV value to recognize red. It can be seen that the recognition effect may not be ideal, and your own hands may be mistakenly recognized. This is because different settings of different cameras and camera images will result in different video screen colors, which may be brighter, darker, greener, etc., resulting in the default HSV value recognition not being very accurate.