1. Multi-machine navigation
1. Multi-machine navigation1.1. Introduction1.2. Use1.2.1, start the robot1.2.2, open multi-machine navigation1.2.3, Set the communication topic1.2.4, Set initial pose1.3. launch file1.4, Framework Analysis
1.1. Introduction
For how to configure multi-machine communication and synchronize time, please refer to the [ROS Distributed Communication] lesson; if there is a network, synchronize the network system time directly without setting.
When using multi-machine control, first make sure that the robots are in the same LAN and configure the same [ROS_MASTER_URI]; there can only be one master for multiple robots to control movement. In this section, the virtual machine is set as the master and other robots as slaves. There can be several slaves; of course, you can also set one robot as the master and the others as slaves.
1.2. Use
Case demonstration: A virtual machine is the master and three robots are slaves,a map must be available before use.
1.2.1, start the robot
Virtual machine side
xxxxxxxxxxroscore
Stop the radar service (robot side - indoor version execution)
xxxxxxxxxxsudo supervisorctl stop LaserServer #Shut down the radar serviceStart command (robot1 side), for the convenience of operation, this section takes [chassis + depth camera] as an example.
xxxxxxxxxxroslaunch yahboom_navrobo_multi scout_mini_robot_base_multi.launch ns:=robot1 # Astra + laser + yahboomStart command (robot2 side), for the convenience of operation, this section takes [chassis + depth camera] as an example.
xxxxxxxxxxroslaunch yahboom_navrobo_multi scout_mini_robot_base_multi.launch ns:=robot2 # Astra + laser + yahboomMore robots can be deduced in the same way.
1.2.2, open multi-machine navigation
Virtual machine side
xxxxxxxxxxroslaunch yahboom_navrobo_multi yahboom_nav_multi.launch use_rviz:=true map:=my_map
- [use_rviz] parameter: whether to open rviz.
- [map] parameter: map name, the map to be loaded.
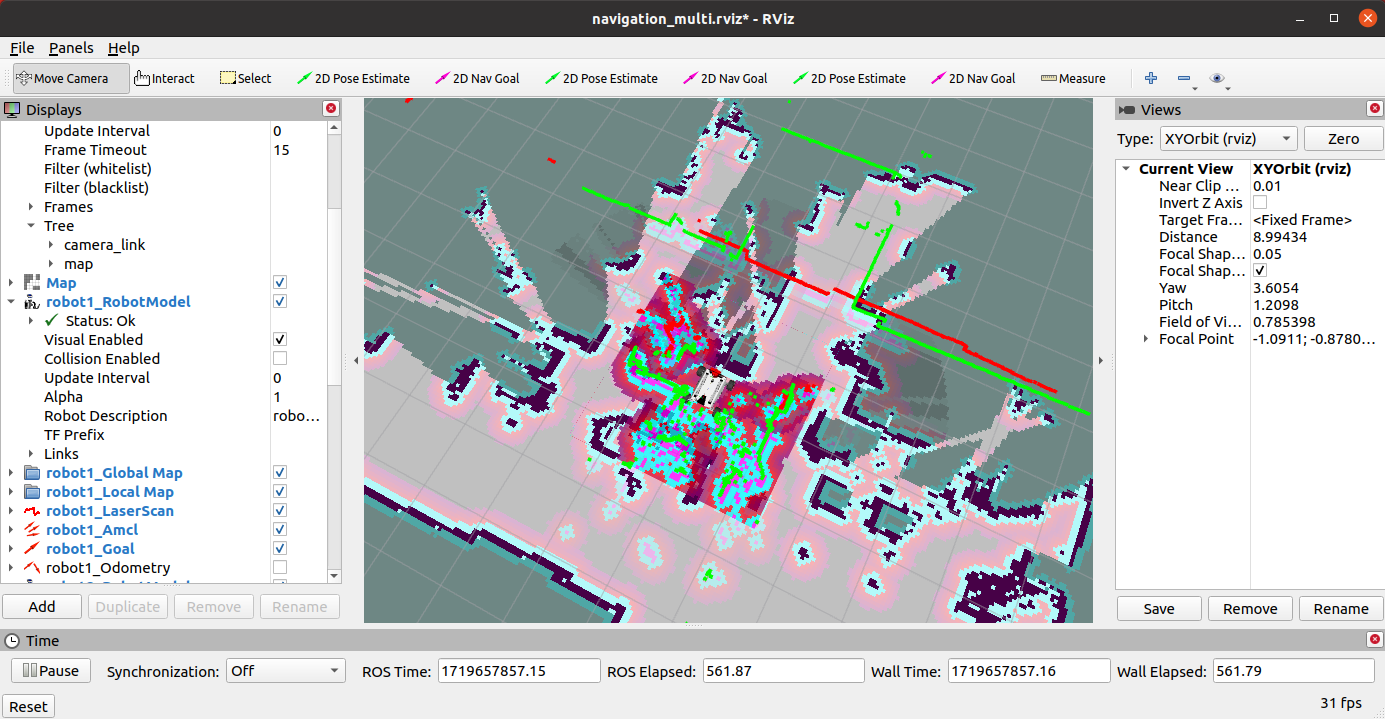
After opening the multi-machine navigation, it is a dense mass, and the position of each robot is incorrect. First, the initial position of each robot must be set.
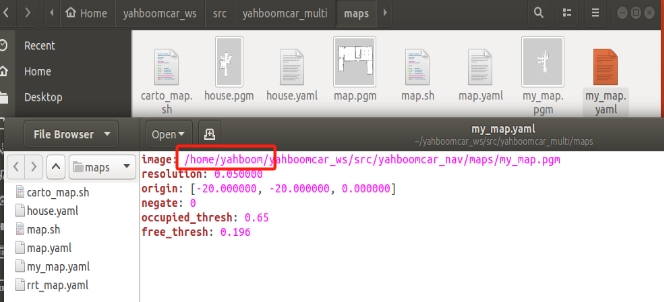
Tip: If my_map error is prompted during startup
The terminal content path of the .yaml file should be changed correctly
1.2.3, Set the communication topic
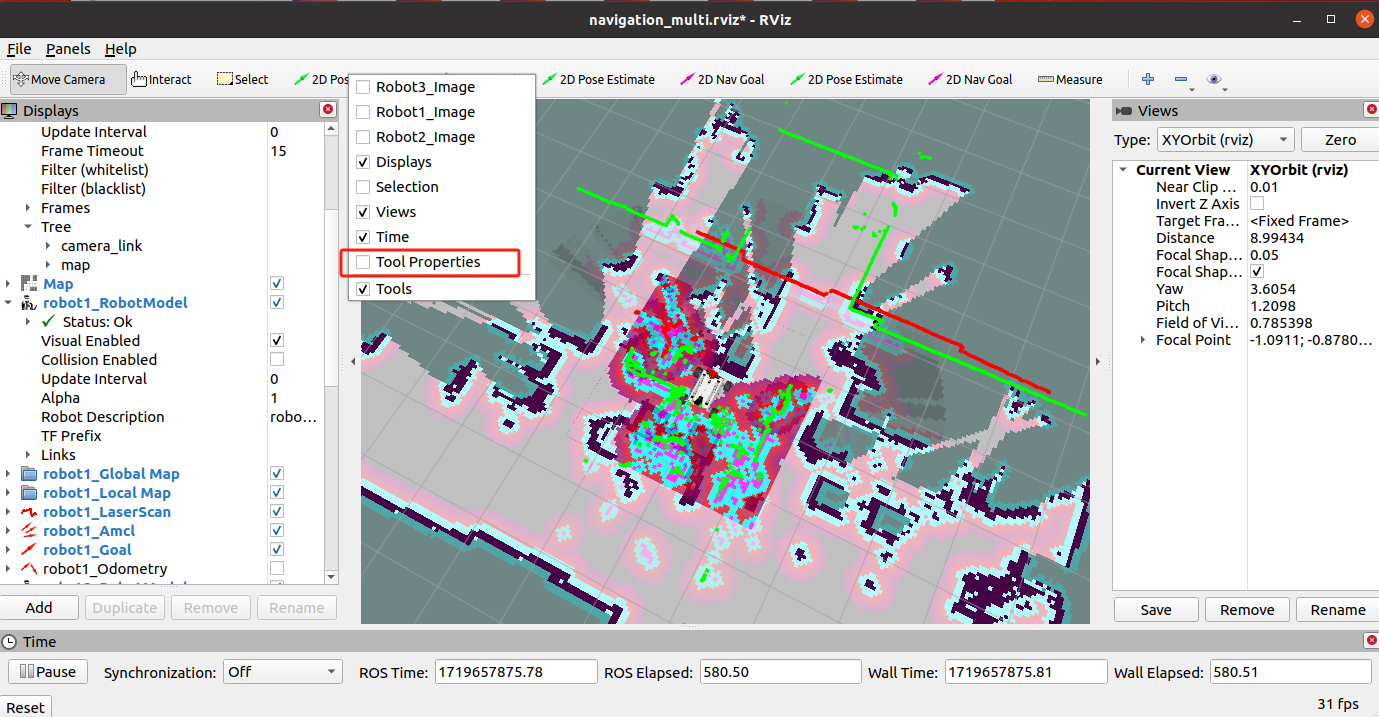
Right-click on the toolbar (green frame) to pop up a dialog box (red frame), as shown in the figure above, right-click on [2D Pose Estimate], and then select [Tool Properties], as shown in the figure below, a dialog box pops up.
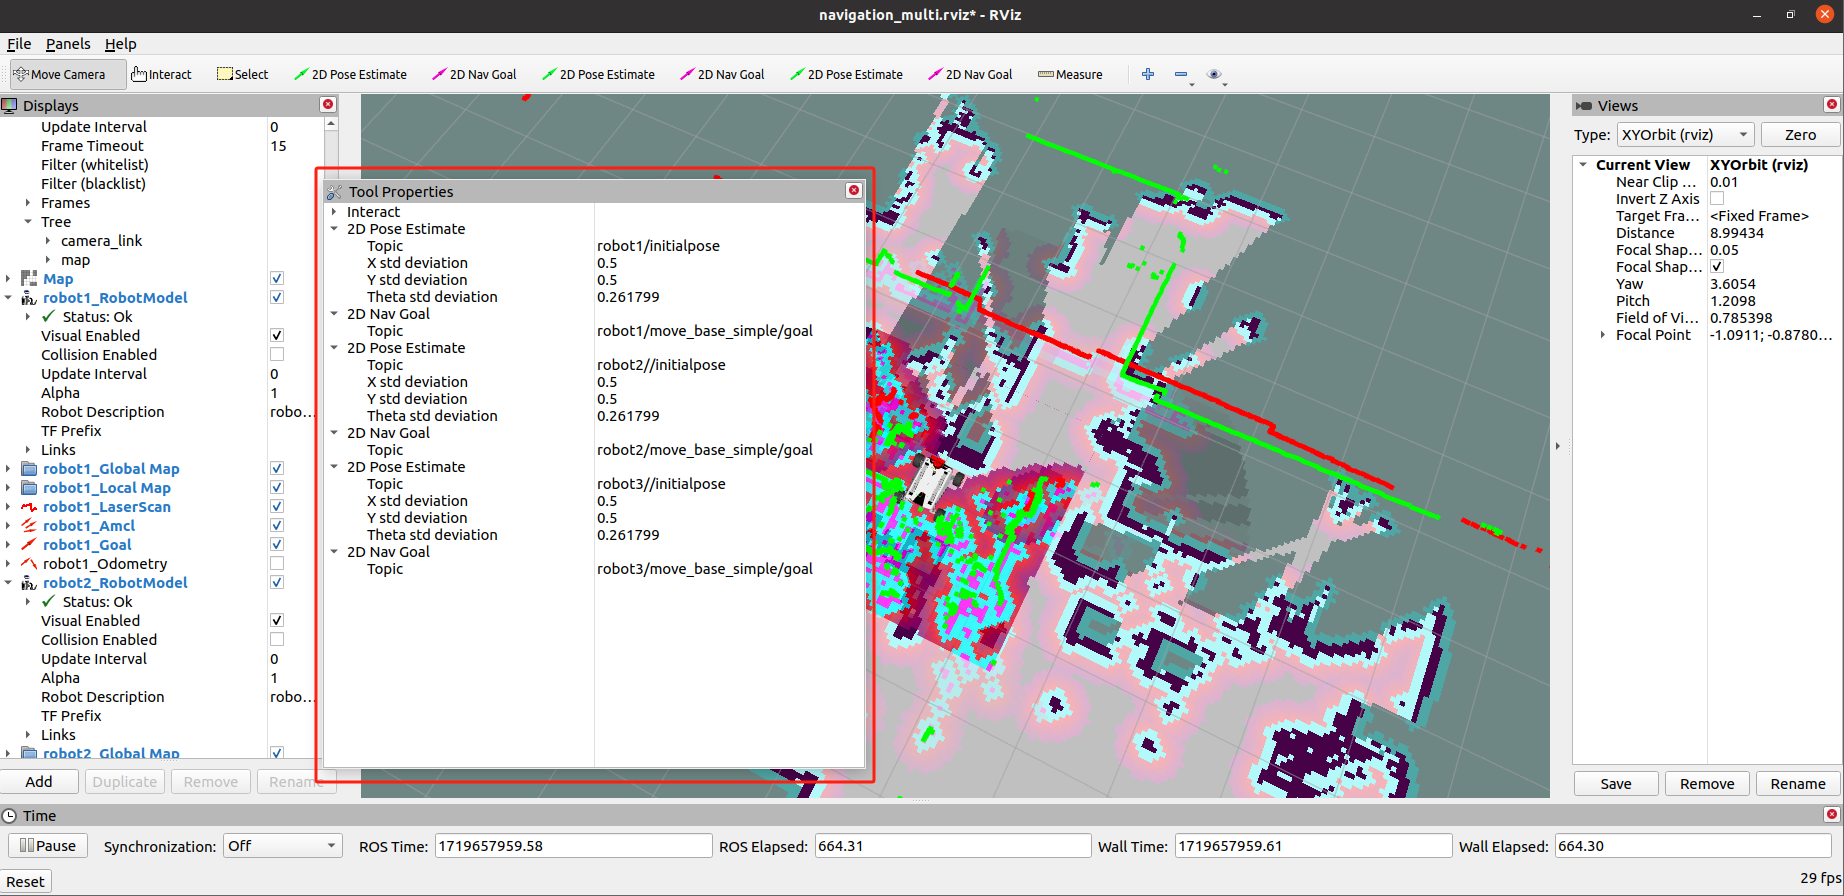
From top to bottom, [2D Pose Estimate] and [2D Nav Goal] correspond to the [rviz] toolbar from left to right. Set the topic name pointed by the red arrow. This method is fast and convenient.
If there are 4 or more robots, the initial pose and navigation icons seem to be insufficient. What should I do?
At this time, you need to open the [navigation_multi.rviz] file (open whichever rviz you use, take [navigation_multi.rviz] as an example) and find the following content. These contents correspond to the icons in the rviz toolbar one by one. If you want to add an icon, copy the entire [Class] content of that icon. Nothing must be missing, and the format must be correct.
xxxxxxxxxxTools:- Class: rviz/MoveCamera- Class: rviz/Interact Hide Inactive Objects: true- Class: rviz/Select- Class: rviz/SetInitialPose Theta std deviation: 0.2617993950843811 Topic: robot1/initialpose X std deviation: 0.5 Y std deviation: 0.5- Class: rviz/SetGoal Topic: robot1/move_base_simple/goal- Class: rviz/SetInitialPose Theta std deviation: 0.2617993950843811 Topic: robot2//initialpose X std deviation: 0.5 Y std deviation: 0.5- Class: rviz/SetGoal Topic: robot2/move_base_simple/goal- Class: rviz/SetInitialPose Theta std deviation: 0.2617993950843811 Topic: robot3//initialpose X std deviation: 0.5 Y std deviation: 0.5- Class: rviz/SetGoal Topic: robot3/move_base_simple/goal- Class: rviz/Measure1.2.4, Set initial pose
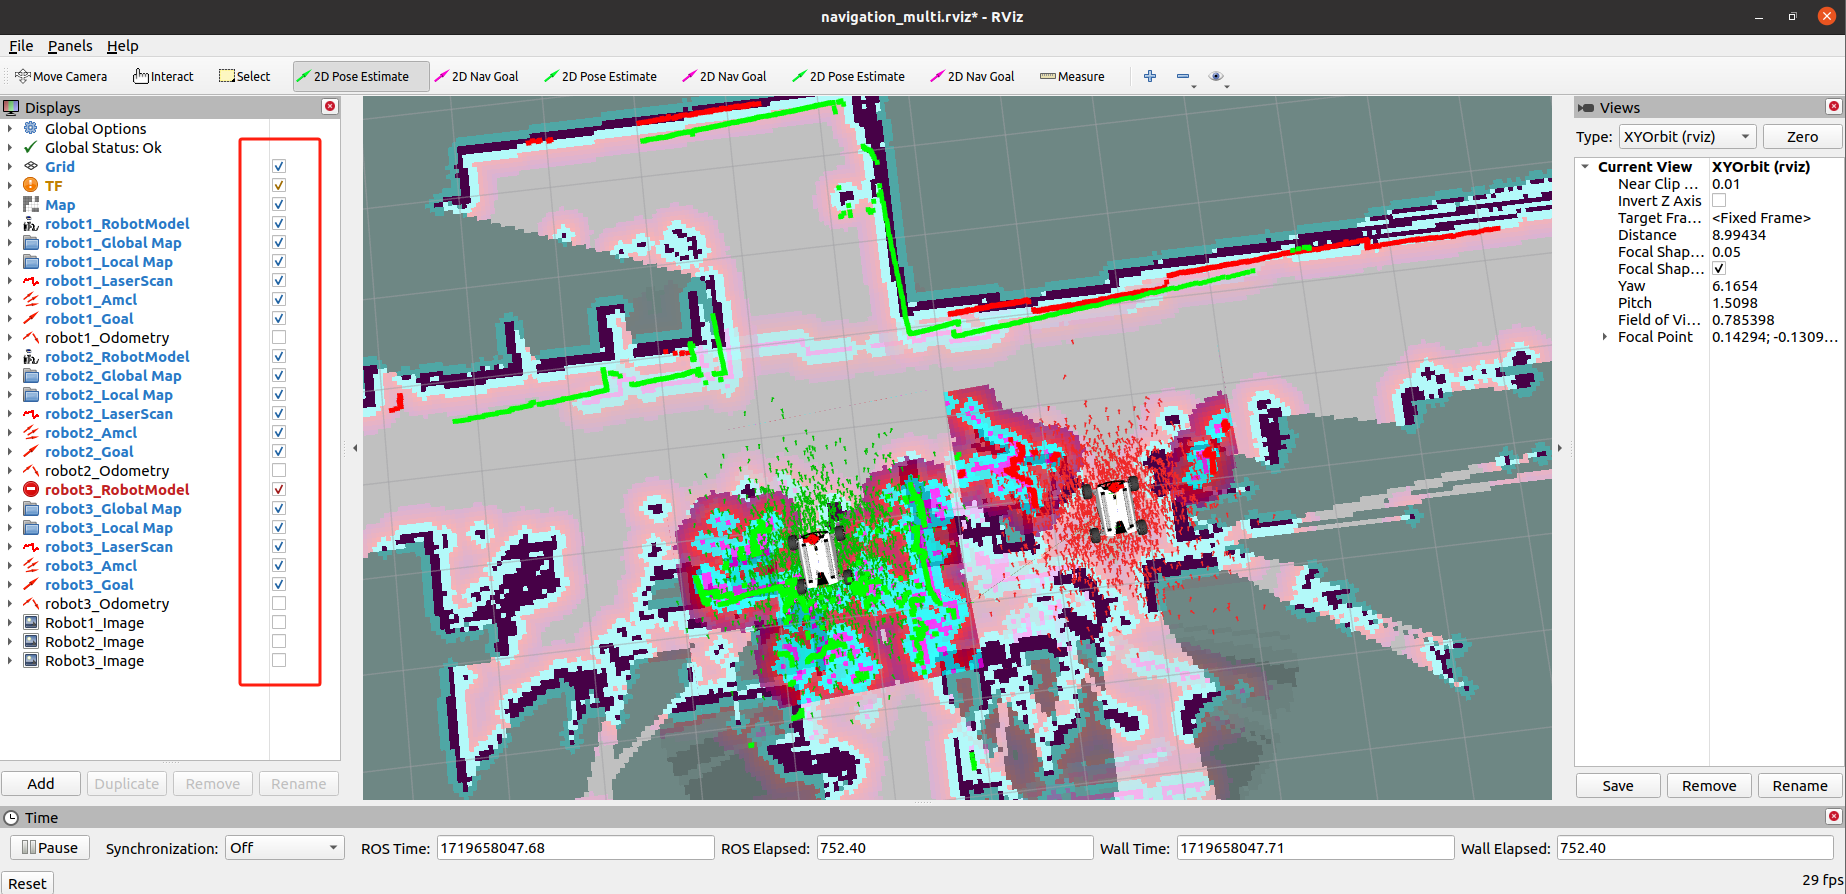
There are too many robots and the information on the map is very complicated. In this case, you can uncheck the check mark behind the robot in the display item list on the left [Displays] and set the pose for each robot in turn. The effect after setting is as follows. You can navigate after setting.
- Use the [2D Pose Estimate] of the [rviz] tool to set the initial pose until the position of the car in the simulation is consistent with the actual position of the car.
- Click the [2D Nav Goal] of the [rviz] tool, and then select the target point on the map where there are no obstacles. Release the mouse to start navigation. You can only select one target point and stop when you reach it.
1.3. launch file
xxxxxxxxxx<launch> <arg name="first_robot1" default="robot1"/> <arg name="second_robot2" default="robot2"/> <arg name="third_robot3" default="robot3"/> <!-- 是否打开rviz || Whether to open rviz --> <arg name="use_rviz" default="true"/> <!-- 地图名 || Map name --> <arg name="map" default="my_map"/> <!-- 加载地图 || Load map --> <node name="map_server" pkg="map_server" type="map_server" args="$(find yahboomcar_nav)/maps/$(arg map).yaml"/> <node pkg="rviz" type="rviz" name="rviz" required="true" args="-d $(find yahboom_navrobo_multi)/rviz/navigation_multi.rviz" if="$(arg use_rviz)"/> <!-- ############################# first_robot1 ############################# --> <include file="$(find yahboom_navrobo_multi)/launch/library/move_base_multi.launch"> <arg name="ns" value="$(arg first_robot1)"/> </include> <!-- ############################# second_robot2 ############################# --> <include file="$(find yahboom_navrobo_multi)/launch/library/move_base_multi.launch"> <arg name="ns" value="$(arg second_robot2)"/> </include> <!-- ############################# third_robot3 ############################# --> <include file="$(find yahboom_navrobo_multi)/launch/library/move_base_multi.launch"> <arg name="ns" value="$(arg third_robot3)"/> </include></launch>You can modify it according to your own needs. If there are 4 or more robots, just add relevant content according to the first 3 cases.
1.4, Framework Analysis
- Node View
xxxxxxxxxxrqt_graph

There are a lot of node graphs, which look complicated, but they are actually very organized. The internal nodes of each robot are almost the same, and the navigation of a single robot is also the same. It should be noted here that the map only needs to be loaded once, and it is not necessary to load it for each robot.
- View tf tree
xxxxxxxxxxrosrun rqt_tf_tree rqt_tf_tree

There are also a lot of tf coordinate systems, which need to be enlarged. There is only one [map] in the world, and each [amcl] locates each robot separately. From then on, it is the same as the navigation of a single robot.
x