9.Mediapipe palm control car
9.Mediapipe palm control car9.1. Introduction9.2. Use9.3、MediaPipe Hands9.4. Core files9.4.1、mediaArm.launch9.4.2、RobotCtrl.py9.5. Flowchart
9.1. Introduction
MediaPipe is a data stream processing machine learning application development framework developed and open sourced by Google. It is a graph-based data processing pipeline for building data sources that use many forms, such as video, audio, sensor data, and any time series data. MediaPipe is cross-platform and can run on embedded platforms (Raspberry Pi, etc.), mobile devices (iOS and Android), workstations and servers, and supports mobile GPU acceleration. MediaPipe provides cross-platform, customizable ML solutions for real-time and streaming.
9.2. Use
Note: [R2] on the remote control handle has the [pause/start] function for this gameplay.
The case in this section may run very slowly on the robot main control. It is recommended to connect the camera to the virtual machine. The NX main control effect will be better. You can try it.
jetson motherboard/Raspberry Pi 4B
roslaunch arm_mediapipe mediaArm.launch # robotrosrun arm_mediapipe RobotCtrl.py # It is recommended that a virtual machine (equipped with a camera) can also be run on the carRaspberry Pi 5
Before running, please confirm that the large program has been permanently closed
Enter docker
Note: If there is a terminal that automatically starts docker, or there is a docker terminal that has been opened, you can directly enter the docker terminal to run the command, and there is no need to manually start docker
Start docker manually
xxxxxxxxxx./run_docker.sh
robot side
xxxxxxxxxxroslaunch arm_mediapipe mediaArm.launch
Enter the same docker from multiple terminals
Keep the program of the previous docker terminal running and open a new terminal
Enter the following command
xxxxxxxxxxdocker ps
Enter the same docker and use the following 18870bc3dc00 to modify the ID displayed on the actual terminal.
xxxxxxxxxxdocker exec -it 18870bc3dc00 /bin/bash
It is recommended that a virtual machine (equipped with a camera) can also be run on a car
xxxxxxxxxxrosrun arm_mediapipe RobotCtrl.py
After startup, press R2 on the handle to turn on the function, and you can use the web page to view the screen.
The car will control the movement of the chassis based on the position of the palm of the hand in the screen.
Palm is at the top of the screen -> the car moves forward
The palm is at the bottom of the screen -> the car moves backwards
The palm is on the left side of the screen -> the car moves to the left
The palm is at the bottom of the screen -> the car moves to the right
9.3、MediaPipe Hands
MediaPipe Hands is a high-fidelity hand and finger tracking solution. It utilizes machine learning (ML) to infer the 3D coordinates of 21 hands from a frame.
After palm detection is performed on the entire image, accurate key point positioning is performed on the 21 3D hand joint coordinates in the detected hand region by regression according to the hand marker model, that is, direct coordinate prediction. The model learns consistent internal hand pose representations and is robust to even partially visible hands and self-occlusion.
To obtain the ground truth data, about 30K real-world images were manually annotated with 21 3D coordinates as shown below (Z-values were obtained from the image depth map, if each corresponding coordinate had a Z-value). To better cover the possible hand poses and provide additional supervision on the nature of the hand geometry, high-quality synthetic hand models in various contexts are also drawn and mapped to the corresponding 3D coordinates.
9.4. Core files
9.4.1、mediaArm.launch
xxxxxxxxxx<launch> <include file="$(find transbot_bringup)/launch/bringup.launch"/> <node name="msgToimg" pkg="arm_mediapipe" type="msgToimg.py" output="screen" required="true"/></launch>9.4.2、RobotCtrl.py
Code reference location
xxxxxxxxxx~/transbot_ws/src/arm_mediapipe/scriptsCode analysis
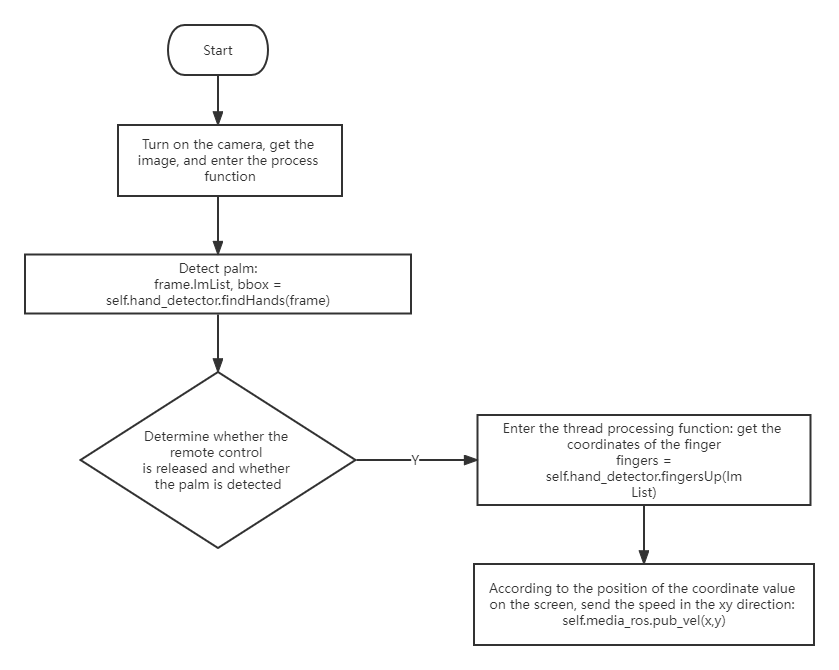
1)、Import the corresponding library file
xxxxxxxxxxfrom media_library import *This library file mainly includes detecting palms, fingers and obtaining the coordinates of each finger joint.
2)、Detect the palm, get the finger coordinates
xxxxxxxxxxfingers = self.hand_detector.fingersUp(lmList)point_x = lmList[9][1] #x valuepoint_y = lmList[9][2] #Y valueCombining with the pictures in 9.3, we can know that what is actually obtained is the coordinates of the first joint of the middle finger of our palm. By judging the position of this coordinate in the picture and sending it to the speed of the chassis in the xy direction, the control can be realized.
9.5. Flowchart