6.yolov4-tiny
6.yolov4-tiny6.1. Introduction6.2. Use6.3. Folder structure6.4. Environmental requirements6.5. Customized training data set6.5.1. Create data set6.5.2. Add weight file6.5.3. Create label file6.5.4. Modify the train.py file6.5.5. Model detection
yolov4-tiny official website: https://github.com/AlexeyAB/darknet
Source code: https://github.com/bubbliiiiing/yolov4-tiny-tf2
6.1. Introduction
Release time node
2020.04: YOLOv4 officially released
2020.06: YOLOv4-Tiny officially released
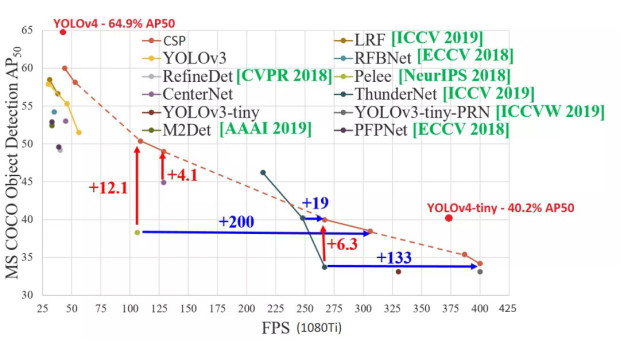
YOLOv4-Tiny performance on COCO: 40.2% AP50, 371 FPS (GTX 1080 Ti) Whether it is AP or FPS performance, it is a huge improvement compared to YOLOv3-Tiny, Pelee, and CSP. As shown below:
Comparison of YOLOv4 and YOLOv4-Tiny detection results, source network
YOLOv4 test results
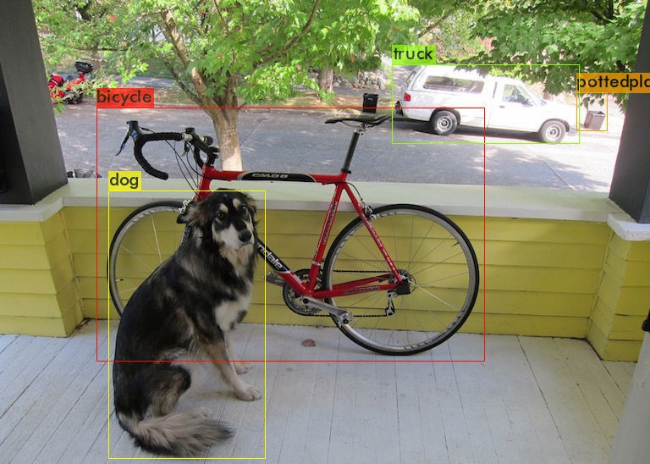
xxxxxxxxxxDone! Loaded 162 layers from weights-filedata/dog.jpg: Predicted in 27.039000 milli-seconds.Bicycle: 92%dog: 98%truck: 92%Potted plants: 33%YOLOv4-Tiny test results
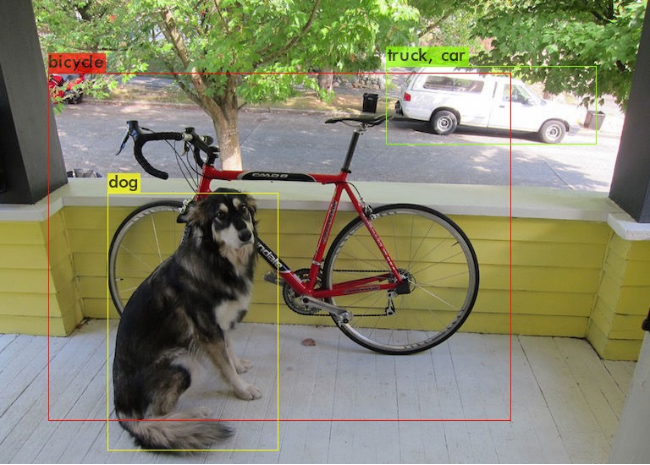
xxxxxxxxxxDone! Loaded 38 layers from weights-filedata/dog.jpg: Predicted in 2.609000 milli-seconds.Bicycle: 29%dog: 72%truck: 82%cars: 46%We can see that the detection accuracy of Yolov4-tiny has declined, but Yolov4-tiny has obvious advantages in terms of time consumption: Yolov4-tiny detection takes only 2.6 milliseconds, while Yolov4 detection takes 27 milliseconds, which is faster. More than 10 times!
6.2. Use
xxxxxxxxxx#Raspberry Pi 5 master needs to enter docker first, please perform this step#If running the script into docker fails, please refer to ROS/07, Docker tutorial~/run_docker.shxxxxxxxxxxroslaunch yahboomcar_yolov4_tiny yolodetect.launch display:=true[display] parameter: whether to enable the visual interface.
Supports real-time monitoring of web pages, such as:
xxxxxxxxxx192.168.2.89:8080
View node information
xxxxxxxxxxrqt_graph

Print detection information
xxxxxxxxxxrostopic echo /DetectMsg
Print as follows
xxxxxxxxxxdata: - frame_id: "person" stamp: secs: 1646128857 nsecs: 530594825 scores: 0.609634816647 ptx: 109.685585022 pty: -2.94450759888 distw: 374.364135742 Disth: 236.672561646 centerx: 187.182067871 centery: 118.336280823frame_id: identification name.
scores: recognition scores.
ptx, pty: Coordinates of the upper left corner of the identification box.
distw, disth: the width and height of the identification box.
centerx, centery: identify the center.
6.3. Folder structure
xxxxxxxxxxyolov4-tiny-tf2├── font # Store font package│ └── Block_Simplified.TTF├── garbage_data # Data set│ ├── GetData.py # Get the data set code│ ├── image # Target source file│ ├── JPEGImages # Data set pictures (as many as possible)│ ├── texture # Background image (as many as possible)│ └── train.txt # Label file corresponding to the data set image├── img # Store test images│ └── 1.jpg├── logs # Store test logs and final training model last1.h5.├── model_data #Storage pre-trained model (weight file)│ ├── coco.txt│ ├── garbage.h5│ ├── garbage.txt # Custom label file (corresponding to the target source file)│ ├── yolo_anchors.txt│ ├── yolov4_tiny_weights_coco.h5 # Weight file│ └── yolov4_tiny_weights_voc.h5 # Weight file├── predict_img.py # Image detection code├── predict_video.py # Video detection code├── README.md├── train.py # Training model code├── utils # library files└── yolo_nets # Network structure library fileThe concept of anchor box was introduced in the YOLO-v2 version, which greatly increased the performance of target detection. The essence of anchor is the reverse of the SPP (spatial pyramid pooling) idea, and what does SPP itself do? It is to combine different sizes The input is resized to become the output of the same size, so the reverse of SPP is to reverse the output of the same size to get the input of different sizes.
6.4. Environmental requirements
The factory image is already configured and no installation is required.
xxxxxxxxxxtensorflow-gpu==2.2.0lxmlmatplotlibpandasPillowscikit-learnseaborntqdimgaug
Installation example
xxxxxxxxxxpip install imgaug
6.5. Customized training data set
6.5.1. Create data set
Method 1: Take some photos first, use the annotation tool to mark the targets on each photo, create a new [train.txt] file under the [garbage_data] folder, and write the target information in a specific format.
Method 2: Put background images (as many as possible) in the [garbage_data/texture] folder, modify the [GetData.py] code as needed, and execute [GetData.py] to generate a data set (as many as possible).
The names of the pictures and label files must correspond. The label format in the [train.txt] file is as follows:
xxxxxxxxxx./garbage_data/JPEGImages/0.jpg 113,163,293,298,9 # Image path y, x, y + w, x + h ,labelTake method 2 as an example.
Open the [GetData.py] file
xxxxxxxxxxsudo vim GetData.py
Modify the total number of generated data sets and fill it in as needed. [More], too few data sets will lead to unsatisfactory training results.
xxxxxxxxxximg_total=10000Run the [GetData.py] file to obtain the data set
xxxxxxxxxxpython GetData.py
6.5.2. Add weight file
There are good weight files (pre-trained models) [yolov4_tiny_weights_coco.h5] and [yolov4_tiny_weights_voc.h5] provided under the [model_data] file. Choose one of the two, and recommend coco’s weight file.
If you need the latest weight file, just search it on Baidu and download it.
6.5.3. Create label file
Be careful not to use Chinese tags and there should be no spaces in the folder!
For example: garbage.txt
xxxxxxxxxxZip_top_canOld_school_bagNewspaperBookToilet_paper... ...
6.5.4. Modify the train.py file
Modify according to your own needs by referring to the comments.
xxxxxxxxxx# label positionannotation_path = 'garbage_data/train.txt'# Get the location of classes and anchorclasses_path = 'model_data/garbage.txt'anchors_path = 'model_data/yolo_anchors.txt'# Location of pre-trained modelweights_path = 'model_data/yolov4_tiny_weights_coco.h5'# Get classes and anchorclass_names = get_classes(classes_path)anchors = get_anchors(anchors_path)#How many categories are there in total?num_classes = len(class_names)num_anchors = len(anchors)# The location where the trained model is savedlog_dir = 'logs/'# Enter the image size. If the video memory is large, 608x608 can be used.input_shape = (416,416)#Initial epoch valueInit_epoch = 0# Freeze the epoch value of trainingFreeze_epoch = 50# The size of Batch_size indicates how much data is fed each time. If there is OOM or insufficient video memory, please adjust it smaller.batch_size = 16# Maximum learning ratelearning_rate_base = 1e-3#Total epoch valueEpoch = 100Follow the above process, and after the operation is completed, directly run the [train.py] file for training.
xxxxxxxxxxpython3train.py
6.5.5. Model detection
Modify the yolov4-tiny-tf2/utils/yolo.py file
xxxxxxxxxxclass YOLO(object): _defaults = { # Used to detect and train the model path. "model_path": 'model_data/garbage.h5', # yolo model parameter anchors path "anchors_path": 'model_data/yolo_anchors.txt', # Custom label file path "classes_path": 'model_data/garbage.txt', "score" : 0.5, "iou" : 0.3, "eager" : False, # The default is 416x416 (image size) "model_image_size" : (416, 416) }... ...#Font package pathself.font_path = 'font/Block_Simplified.TTF'Image detection
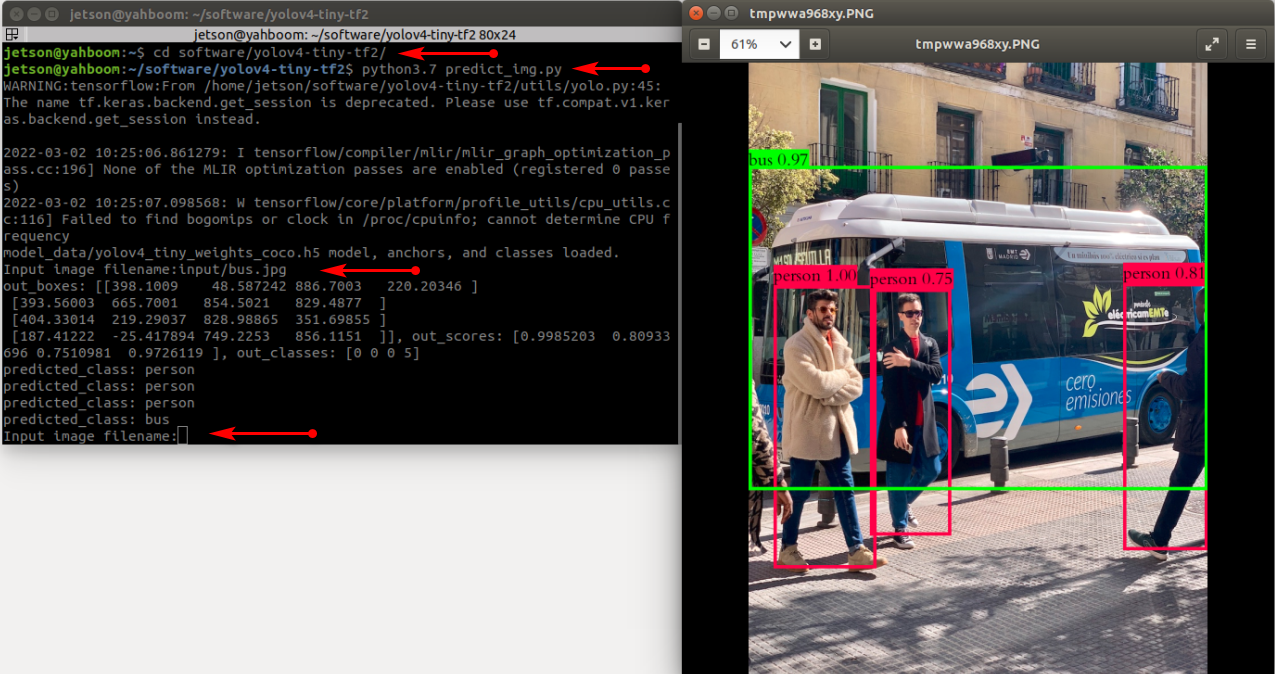
xxxxxxxxxxpython3 predict_img.py
During this period, you need to manually enter the images that need to be detected, as shown below:
Video detection
python3 predict_video.py