4、yolov5 model training
4、yolov5 model training4.1. yolov5 introduction4.2. Environmental requirements4.3. Usage process4.4. Custom training data set4.4.1. Collect data sets4.4.2. Create yaml file4.5.3. Modify train.py4.5.4. Modify model configuration file4.5.5. Modify detect.py4.5.6. Training and prediction
yolov5 official tutorial: https://github.com/ultralytics/yolov5/blob/master/tutorial.ipynb
yolov5 official source code: https://github.com/ultralytics/yolov5
yolov5 weight file: https://github.com/ultralytics/yolov5/releases
4.1. yolov5 introduction
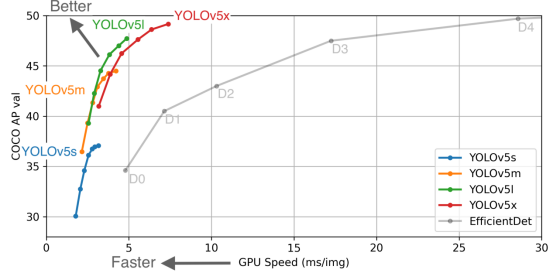
In February 2020, Joseph Redmon, the father of YOLO, announced his withdrawal from the field of computer vision research. YOLOv4 was released on April 23, 2020, and YOLOv5 was released on June 10, 2020. The developer of YOLOv5 claims that YOLOv5 can achieve a fast detection of 140 FPS on Tesla P100; while the detection speed of YOLOv4 is 50 FPS. Not only that, the size of YOLOv5 is only 27 MB. YOLOv4 is 244 MB. YOLOv5 is nearly 90% smaller than YOLOv4. In terms of accuracy metrics, YOLOv5 is comparable to YOLOv4.
As a result, YOLOv5 is very fast, has a very lightweight model size, and is as accurate as the YOLOv4 baseline.
Yolov5 author’s algorithm performance test chart:
Video test official case
cd ~/software/yolov5python3 detect.py --source 0Important folder description:
- data:stores the yaml files that need to be loaded during training
- garbage:stores the data set generation program and garbage identification related files, including the generated training data set (train/images)
- models:stores some training configuration files, such as yolov5s.yaml
- runs:storage of trained data model (train) and prediction result output folder (detect)
4.2. Environmental requirements
The factory image has been configured and no installation is required.
x# YOLOv5 馃殌 requirements# Usage: pip install -r requirements.txt
# Base ------------------------------------------------------------------------gitpythonipython # interactive notebookmatplotlib>=3.2.2numpy>=1.18.5#opencv-python>=4.1.1Pillow>=7.1.2psutil # system resourcesPyYAML>=5.3.1requests>=2.23.0scipy>=1.4.1thop>=0.1.1 # FLOPs computation#torch>=1.7.0 # see https://pytorch.org/get-started/locally (recommended)#torchvision>=0.8.1tqdm>=4.64.0# protobuf<=3.20.1 # https://github.com/ultralytics/yolov5/issues/8012
# Logging ---------------------------------------------------------------------tensorboard>=2.4.1# clearml>=1.2.0# comet
# Plotting --------------------------------------------------------------------pandas>=1.1.4seaborn>=0.11.0
# Export ----------------------------------------------------------------------# coremltools>=6.0 # CoreML export# onnx>=1.9.0 # ONNX export# onnx-simplifier>=0.4.1 # ONNX simplifier# nvidia-pyindex # TensorRT export# nvidia-tensorrt # TensorRT export# scikit-learn<=1.1.2 # CoreML quantization# tensorflow>=2.4.1 # TF exports (-cpu, -aarch64, -macos)# tensorflowjs>=3.9.0 # TF.js export# openvino-dev # OpenVINO export
# Deploy ----------------------------------------------------------------------# tritonclient[all]~=2.24.0
# Extras ----------------------------------------------------------------------# mss # screenshots# albumentations>=1.0.3# pycocotools>=2.0 # COCO mAP# roboflow# ultralytics # HUB https://hub.ultralytics.com
Installation example
xxxxxxxxxxpip install imgaug
4.3. Usage process
After completing the configuration according to the above process
Under the path [garbage/texture], fill in more background images ([more])
Run the [Get_garbageData.py] file to obtain the data set (you need to modify the number of types in line 120 and the number of generated data sets in line 156 [more])
xxxxxxxxxxfor i in range(0, 10):index = np.random.randint(0, 16)readimg = cv.imread('./image/' + str(index) + '.png')readimg = cv.resize(readimg, (200, 200))overlay = random_augment(readimg)h, w = overlay.shape[:2]x = np.random.randint(0, 416 - h)y = np.random.randint(0, 416 - w)if checkOverlap(rectangles, (y, x, y + w, x + h)): continuehsv = cv.cvtColor(overlay, cv.COLOR_BGR2HSV)lowerb = (35, 43, 36)upperb = (77, 255, 255)dst = cv.inRange(hsv, lowerb, upperb)...............16 represents the number of types, which should be modified according to the actual number of recognized types.
xxxxxxxxxxdef generateImage():rootdir = './texture'# List all directories and files in a folder# List all directories and files in a folderlist = os.listdir(rootdir)for i in range(0, 100):index = np.random.randint(0, len(list))txt_path = os.path.join(rootdir, list[index])overlay, label = transparentOverlay(txt_path)cv.imwrite("./train/images/" + str(i) + ".jpg", overlay)with open("./train/labels/" + str(i) + ".txt", "w") as wf:wf.write(label)wf.flush()100 means generating 100 training images.
Run the [train.py] file to start training
Run [detect.py] for image prediction
4.4. Custom training data set
4.4.1. Collect data sets
First go to Baidu to download or use other methods. Under the path [garbage/texture], fill in more background images ([more])
Run the [Get_garbageData.py] file to obtain the data set
xxxxxxxxxxcd ~/software/yolov5/garbagepython3 Get_garbageData.py
4.4.2. Create yaml file
For example garbage.yaml:
xxxxxxxxxxtrain: /home/jetson/software/yolov5/garbage/train/images # train images Path to generate training data setval: /home/jetson/software/yolov5/garbage/train/images # val images Path to generate training data setnames: 0: Zip_top_can 1: Old_school_bag 2: Newspaper 3: Book 4: Toilet_paper 5: Peach_pit 6: Cigarette_butts 7: Disposable_chopsticks 8: Egg_shell 9: Apple_core 10: Watermelon_rind 11: Fish_bone 12: Expired_tablets 13: Expired_cosmetics 14: Used_batteries 15: Syringe4.5.3. Modify train.py
xxxxxxxxxxparser.add_argument('--weights', type=str, default=ROOT / 'yolov5s.pt', help='initial weights path') # Pre-trained weightsparser.add_argument('--data', type=str, default=ROOT / 'data/garbage.yaml', help='dataset.yaml path') #Custom training filesparser.add_argument('--epochs', type=int, default=100, help='total training epochs') # Customize training epochs, how many rounds of trainingparser.add_argument('--batch-size', type=int, default=-1, help='total batch size for all GPUs, -1 for autobatch') # Total batch size across all GPUsparser.add_argument('--imgsz', '--img', '--img-size', type=int, default=640, help='train, val image size (pixels)') # Image sizeparser.add_argument('--device', default='cpu', help='cuda device, i.e. 0 or 0,1,2,3 or cpu') # Choose CPU or GPUparser.add_argument('--project', default=ROOT / 'runs/train', help='save to project/name') # Training result output folderOther places are based on your own needs.
4.5.4. Modify model configuration file
Modify the second line of the yaml file of the yolov5 neural network and use which weight file to modify the corresponding yaml file.
Here we are using yolov5s.yaml, so just modify the second line of the models/yolov5s.yaml file.
xxxxxxxxxxnc: 16 # number of classes4.5.5. Modify detect.py
It’s almost the same place that needs to be modified in the [train.py] file.
xxxxxxxxxxparser.add_argument('--weights', nargs='+', type=str, default=ROOT / 'best.pt', help='model path or triton URL') #Pre-trained weightsparser.add_argument('--source', type=str, default=ROOT / 'data/images', help='file/dir/URL/glob/screen/0(webcam)') # Enter predicted imageparser.add_argument('--imgsz', '--img', '--img-size', nargs='+', type=int, default=[640], help='inference size h,w') # Image sizeparser.add_argument('--device', default='', help='cuda device, i.e. 0 or 0,1,2,3 or cpu') # Choose CPU or GPUparser.add_argument('--project', default=ROOT / 'runs/detect', help='save results to project/name') #Prediction result output folderOther places are based on your own needs.
4.5.6. Training and prediction
xxxxxxxxxxcd ~/software/yolov5python3 train.py
Train the model. After training, the final model will be produced in the [runs/train] folder. By default, the folder with the exp prefix is generated, and the latest one is generated.
Video real-time monitoring requires modifying the model path.
xxxxxxxxxxpython3 detect.py --source 0