7. AR QR code
7. AR QR code7.1. Overview7.2. Create ARTag7.2.1. Install software package7.2.2. Create AR QR code7.3. ARTag identification7.3.1. Start the identification instance7.3.2. launch file analysis7.3.3. ar_track_alvar node7.3.4. View node graph7.3.5. View tf tree7.3.6. View output information
7.1. Overview
wiki:http://wiki.ros.org/ar_track_alvar/
Source code:https://github.com/ros-perception/ar_track_alvar.git
Feature pack location:~/yahboomcar_ws/src/yahboomcar_visual
ARTag (AR tag, AR means "augmented reality") is a benchmark marking system that can be understood as a reference for other objects. It looks similar to a QR code.However, its encoding system is still very different from QR codes. It is mostly used in camera calibration, robot positioning, augmented reality (AR) and other applications. One of its important functions is to identify the pose relationship between the object and the camera. ARTag can be attached to the object, or ARTag label can be attached to the plane to calibrate the camera. After the camera recognizes the ARTag, it can calculate the position and attitude of the tag in the camera coordinates.
ar_track_alvar has 4 main functions:
- Generate AR tags of different sizes, resolutions, and data/ID encodings.
- Recognize and track the pose of a single AR tag, optionally integrating kinect depth data (when kinect is available) for better pose estimation.
- Recognize and track poses in "bundles" consisting of multiple tags. This allows for more stable pose estimation, robustness to occlusions, and tracking of multilateral objects.。
- Automatically calculate spatial relationships between tags in bundles using camera images, so users don't have to manually measure and enter tag locations in an XML file to use the bundle feature.
Alvar is newer and more advanced than ARToolkit, which has been the basis for several other ROS AR tag packages. Alvar features adaptive thresholding to handle various lighting conditions, optical flow-based tracking for more stable pose estimation, and an improved tag identification method that does not slow down significantly as the number of tags increases.
7.2. Create ARTag
7.2.1. Install software package
file path,
/home/jetson/software/ar_track_ws/src/ar_track_alvar/ar_track_alvar
ar_track_alvar is an open source marker library, which provides examples of pr2+kinect. The first use case of this package is to identify and track gestures from (possibly) multiple AR tags, each considered individually.
7.2.2. Create AR QR code
- Generate multiple labels in a row on an image
xxxxxxxxxxrosrun ar_track_alvar createMarker
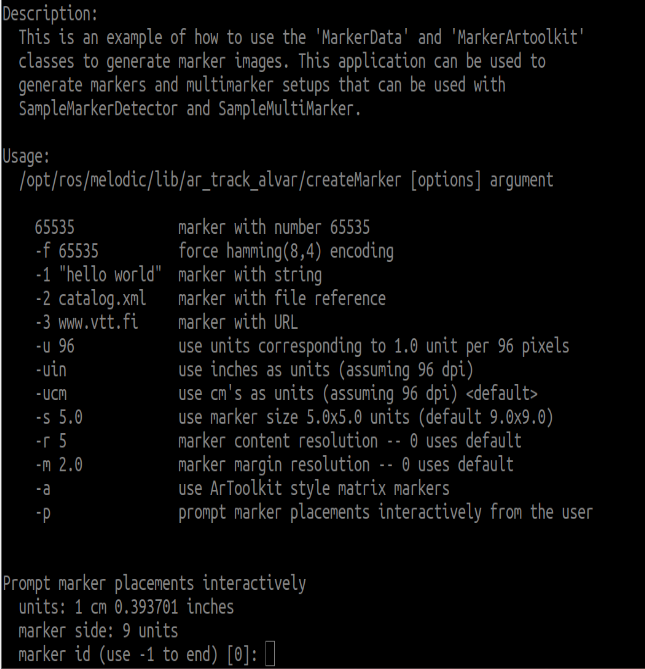
You can enter [ID] and location information here, and enter [-1] to end. One or more can be generated, and the layout can be designed by yourself.

- Generate a single number
Command + parameters directly generate digital pictures; for example
xxxxxxxxxxrosrun ar_track_alvar createMarker 11rosrun ar_track_alvar createMarker -s 5 33
11:The number is the QR code of 11. -s: Specifies the image size. 5:5x5 picture. 33:The number is the QR code of 33. The generated pictures are stored in the directory of the current terminal.
7.3. ARTag identification
Note: When starting the camera, the camera calibration file needs to be loaded, otherwise it cannot be recognized.
7.3.1. Start the identification instance
xxxxxxxxxxroslaunch yahboomcar_visual ar_track.launch open_rviz:=true
- The open_rviz parameter is turned on by default.
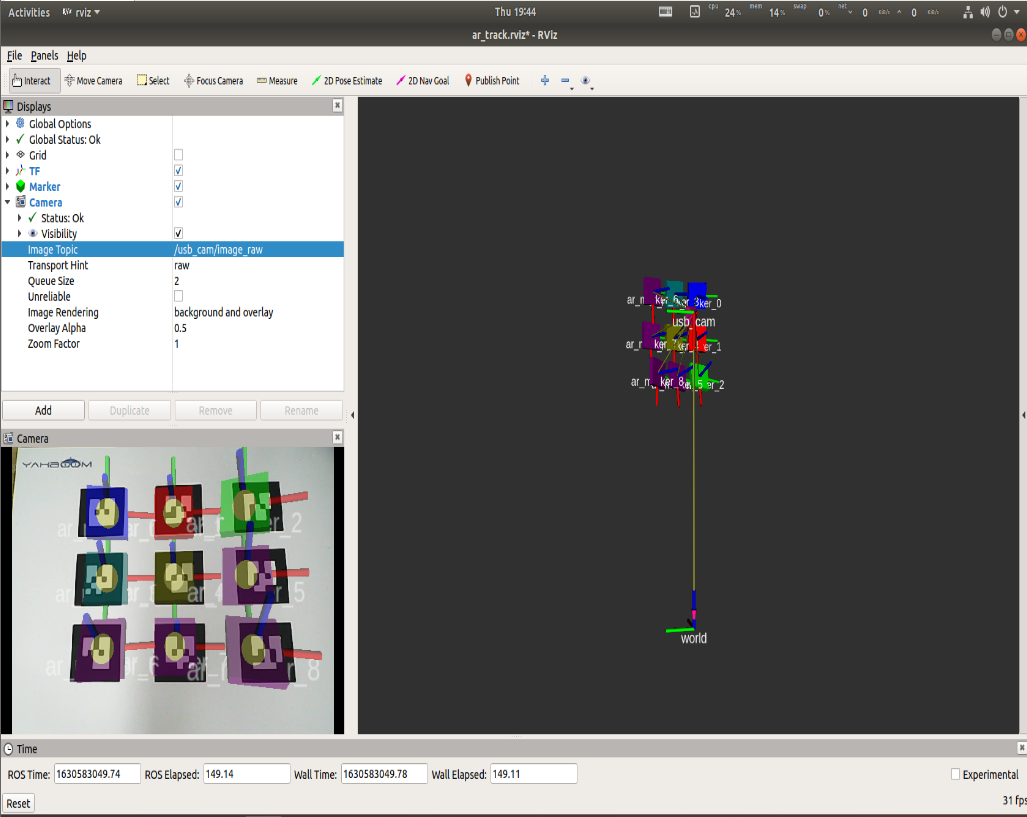
In rviz, you need to set the corresponding camera topic name.
- Image_Topic:The camera topic is [/usb_cam/image_raw].
- Marker:The display component of rviz. Different squares display the location of the AR QR code.
- TF:The display component of rviz, used to display the coordinate system of AR QR codes.
- Camera:The display component of rviz, which displays the camera screen.
- world:world coordinate system.
- usb_cam:camera coordinate system.
7.3.2. launch file analysis
xxxxxxxxxx<launch> <!-- Set camDevice parameters,the default is USBCam --> <arg name="open_rviz" default="true"/> <arg name="marker_size" default="5.0"/> <arg name="max_new_marker_error" default="0.08"/> <arg name="max_track_error" default="0.2"/> <!-- Set camera image topic, camera internal reference topic, camera frame --> <arg name="cam_image_topic" default="/usb_cam/image_raw"/> <arg name="cam_info_topic" default="/usb_cam/camera_info"/> <arg name="output_frame" default="/usb_cam"/> <!-- Start camera node --> <include file="$(find usb_cam)/launch/usb_cam-test.launch"/> <!-- Set the corresponding relationship between the camera coordinate system and the world coordinate system --> <node pkg="tf" type="static_transform_publisher" name="world_to_cam" args="0 0 0.5 0 1.57 0 world usb_cam 10"/> <!-- Start AR recognition node --> <node name="ar_track_alvar" pkg="ar_track_alvar" type="individualMarkersNoKinect" respawn="false" output="screen"> <param name="marker_size" type="double" value="$(arg marker_size)"/> <param name="max_new_marker_error" type="double" value="$(arg max_new_marker_error)"/> <param name="max_track_error" type="double" value="$(arg max_track_error)"/> <param name="output_frame" type="string" value="$(arg output_frame)"/> <remap from="camera_image" to="$(arg cam_image_topic)"/> <remap from="camera_info" to="$(arg cam_info_topic)"/> </node> <!-- start rviz --> <node pkg="rviz" type="rviz" name="rviz" args="-d $(find yahboomcar_visual)/rviz/ar_track.rviz" if="$(arg open_rviz)"/></launch>Node parameters:
- marker_size (double) :Width (in centimeters) of one side of the black square marker border.
- max_new_marker_error (double):Threshold that determines when a new marker can be detected under uncertain conditions.
- max_track_error (double) :A threshold that determines how many tracking errors can be observed before the marker disappears.
- camera_image (string) :Provides the image topic name used to detect AR tags. This can be monochrome or color, but should be an uncorrected image since correction is done in this package.
- camera_info (string) : Subject name that provides camera calibration parameters to correct images.
- output_frame (string) :Publish the coordinate position of the AR label in the camera coordinate system.
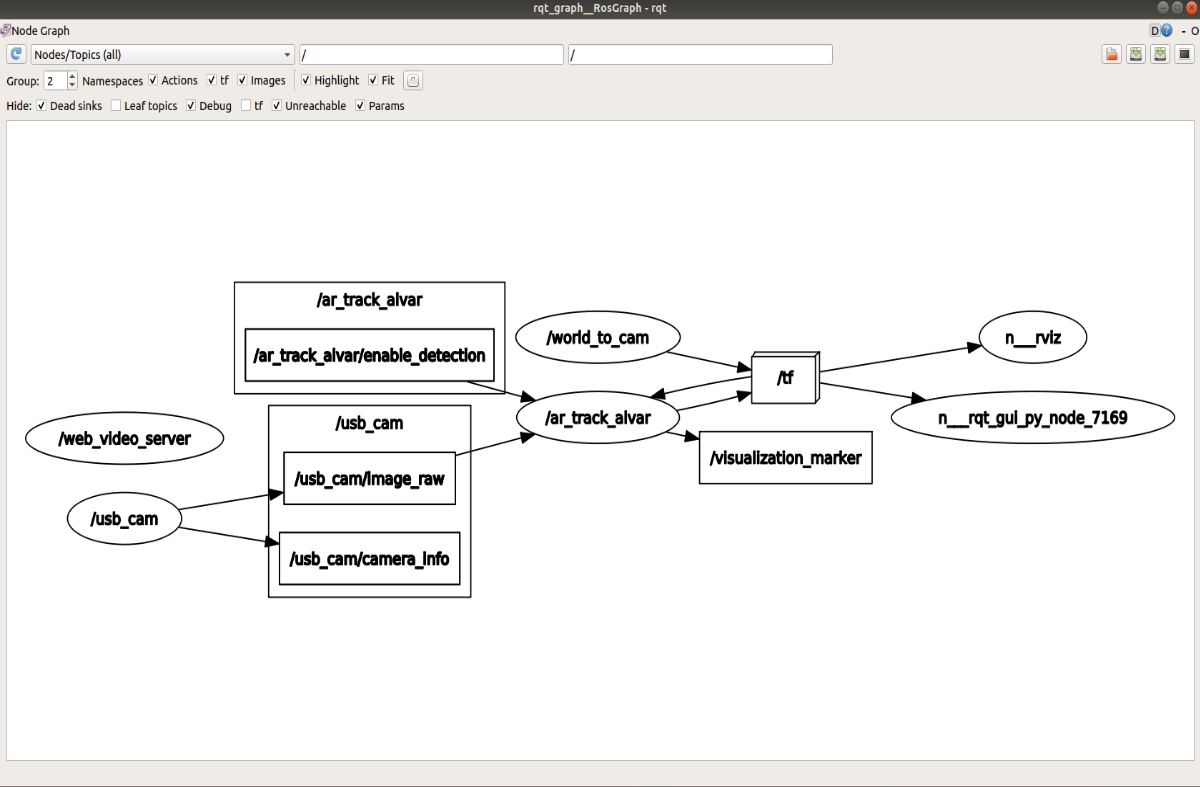
7.3.3. ar_track_alvar node
- Subscribed topic
| topic name | type of data |
|---|---|
| /camera_info | (sensor_msgs/CameraInfo) |
| /image_raw | (sensor_msgs/Image) |
- Published Topics
| topic name | type of data |
|---|---|
| /visualization_marker | (visualization_msgs/Marker) |
| /ar_pose_marker | (ar_track_alvar/AlvarMarkers) |
Provided tf Transforms
Single QR code: Camera coordinate system → AR tag coordinate system
Multiple QR codes: Provides transformation from the camera coordinate system to each AR tag coordinate system (named ar_marker_x), where x is the ID number of the marker.
7.3.4. View node graph
xxxxxxxxxxrqt_graph
7.3.5. View tf tree
xxxxxxxxxxrosrun rqt_tf_tree rqt_tf_tree
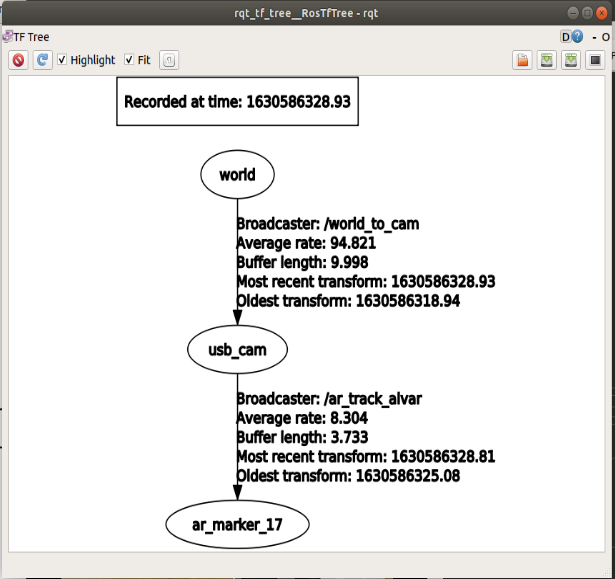
Through rviz, we can intuitively see the relative position of the QR code and the camera. The camera and world coordinate system are set by yourself.
7.3.6. View output information
xxxxxxxxxxrostopic echo /ar_pose_marker
The display is as follows:
xxxxxxxxxxheader:seq: 0stamp:secs: 1630584915nsecs: 196221070frame_id: "/usb_cam"id: 3confidence: 0pose:header:seq: 0stamp:secs: 0nsecs: 0frame_id: ''pose:position:x: 0.0249847882514y: 0.0290736736336z: 0.218054183012orientation:x: 0.682039034537y: 0.681265739969z: -0.156112715404w: 0.215240718735
- frame_id:The coordinate system name of the camera
- id:The identified number is 3
- pose:pose of the QR code
- position:the position of the QR code coordinate system relative to the camera coordinate system
- orientation:the attitude of the QR code coordinate system relative to the camera coordinate system