PWM Pin
1. Learning Objectives
- Learn to experiment with the external buzzer on the Raspberry Pi Pico W board.
- Understand the use of active buzzer.
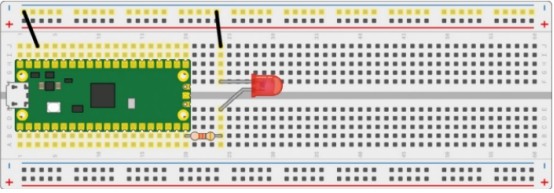
2. Hardware Construction
This course.
LED*1
220Ω resistor*1
3. Program Analysis
PICO W and PICO GPIO pins have the same PWM function.
Every GPIO pin on the PICO W is capable of PWM, but the microcontroller's PWM block consists of eight slices, each with two outputs。
You will know that if you accidentally use the same PWM output twice, because every time you change the PWM value on a pin, it will also affect the conflicting pins. If this happens, look at the pinout diagram in Figure 8-4 and your circuit, and find an unused PWM output.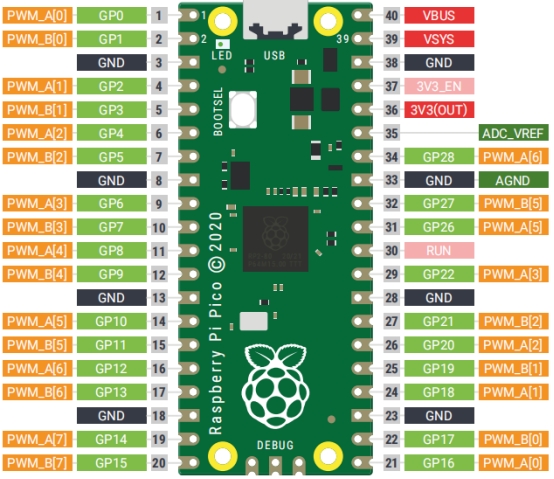
C programming
For the use of SDK in C, please refer to the previous courses related to environment building.
x
int main() { gpio_set_function(15, GPIO_FUNC_PWM);
uint slice_num = pwm_gpio_to_slice_num(15);
pwm_set_wrap(slice_num, 255); pwm_set_chan_level(slice_num, PWM_CHAN_B, 0); // Set the PWM running pwm_set_enabled(slice_num, true); while(1) { for(int i = 0;i <= 255;i++) { pwm_set_chan_level(slice_num, PWM_CHAN_B, i); sleep_ms(50); } for(int i = 255;i >= 0;i--) { pwm_set_chan_level(slice_num, PWM_CHAN_B, i); sleep_ms(50); } }}
#include "hardware/pwm.h" This library contains related functions used by PWM.
gpio_set_function(15, GPIO_FUNC_PWM); Select IO15 function as PWM. The first parameter is the GPIO number, and the second parameter is which function to use from the table. Refer to: enum gpio_function { GPIO_FUNC_XIP = 0, GPIO_FUNC_SPI = 1, GPIO_FUNC_UART = 2, GPIO_FUNC_I2C = 3, GPIO_FUNC_PWM = 4, GPIO_FUNC_SIO = 5, GPIO_FUNC_PIO0 = 6, GPIO_FUNC_PIO1 = 7, GPIO_FUNC_GPCK = 8, GPIO_FUNC_USB = 9, GPIO_FUNC_NULL = 0xf }
pwm_gpio_to_slice_num(15); Return the PWM slice for GPIO15.
pwm_set_wrap(slice_num, 255); set counter before returning to 0 the highest value that will be reached is 255.Also known as TOP.
pwm_set_chan_level(slice_num, PWM_CHAN_B, 0); Set the value of the PWM counter comparison value for channel B. The first parameter is the PWM slice number, the second parameter is the channel number, and the third parameter is the comparison value.
pwm_set_enabled(slice_num, true); Enable/disable PWM. The first parameter is the PWM slice number, the second parameter is true to enable, and false to disable.
Through the While loop, modify the PWM duty cycle value through the for loop.
4. Program creation and burning To create a project, please refer to the previous tutorial on creating a project, which will not be repeated here. After writing the program, you need to add the standard library to the build according to the program you wrote before compiling, open the CMakeLists.txt in the project, and check target_link_libraries(pwm pico_stdlib hardware_pwm), you can see that pico_stdlib and pico_stdlib are used in the previous program. hardware_pwm library. If other libraries are added to the functions used, the corresponding libraries need to be added. If you do not know where to add the libraries, you can go to the official pico-examples case downloaded earlier, which contains the cases of each function and the corresponding CMakeLists.txt file for reference. After the modification is completed, save and exit, and enter the bulid path of the project. Enter the command to compile
xxxxxxxxxxcmake .. && nmakeNeed attention This routine only provides source code. If you want to compile, please create a new project by yourself, and put the source code files into the new project.
Burning After compiling, you can generate files in formats such as .bin .hex .elf .uf2 in the build directory. Drag the u2f in the above file to the disk recognized by Pico W to burn. (Note: When programming for the first time, it is an empty code. Connect Pico W to the USB to directly identify the disk. When there is an executable program in it, you need to press and hold the BOOTSEL button before connecting to the USB)
5. Experimental phenomenon
After the program download is complete, we can see the process of the LED light slowly turning on from off.