On-board LED
1. Learning Objectives
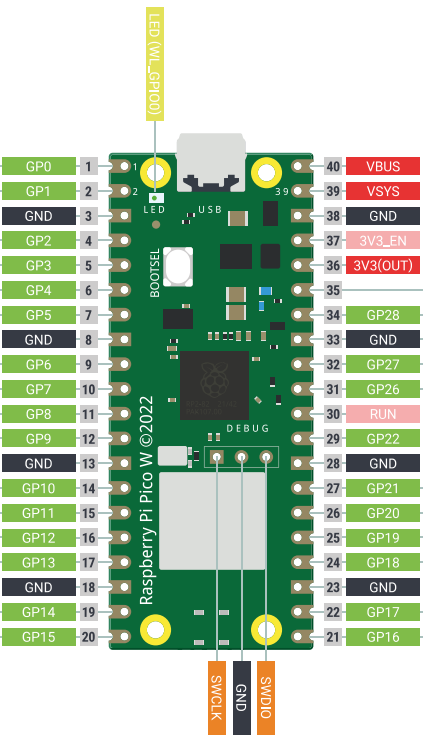
- Learn the basic use of the pins of the Raspberry Pi Pico W board.
- Learn how to control the onboard LED lights.
2. Hardware Construction
This course can directly use the onboard LED lights on the Raspberry Pi Pico W motherboard without additional hardware equipment.
3. Program Analysis
C programming
For the use of C SDK, please refer to the previous courses related to environment construction.
x
int main() { stdio_init_all(); if (cyw43_arch_init()) { printf("LED init failed"); return -1; } while (true) { cyw43_arch_gpio_put(CYW43_WL_GPIO_LED_PIN, 1); sleep_ms(250); cyw43_arch_gpio_put(CYW43_WL_GPIO_LED_PIN, 0); sleep_ms(250); }}#include <stdio.h>
C language standard header files
#include "pico/cyw43_arch.h"
This header file is the wifi network card module on the driver board
#include "pico/stdlib.h"
This header file is a standard header file for the pico family, the library includes common hardware and high-level libraries like hardware_gpio and pico_time, it also introduces components like pico_standard_link.
stdio_init_all()
This statement is the standard initialization of pico W
cyw43_arch_init()
The onboard LED of pico W is different from that of pico. The LED of pico W is on the wifi network card, so call cyw43_arch_init() to initialize the wifi network card.
cyw43_arch_gpio_put(CYW43_WL_GPIO_LED_PIN, 1)
Parameter Description
CYW43_WL_GPIO_LED_PIN: LED interface of the onboard wifi network card, you can see the picture above
1: High level 0: low level
4. Program creation and burning To create a project, please refer to the previous tutorial on creating a project, which will not be repeated here. After writing the program, you need to add the standard library to the build according to the program you wrote before compiling, open the CMakeLists.txt in the project, and check target_link_libraries(blink pico_stdlib pico_cyw43_arch_none), you can see that because the previous program uses pico_stdlib and pico_cyw43_arch_none library, so added pico_stdlib and pico_cyw43_arch_none. If other libraries are added to the functions used, the corresponding libraries need to be added. If you do not know where to add the libraries, you can go to the official pico-examples case downloaded earlier, which contains the cases of each function and the corresponding CMakeLists.txt file for reference. After modifying CMakeLists.txt, save and exit, and then enter the bulid path of the project Enter the command to compile
xxxxxxxxxxcmake -DPICO_BOARD=pico_w .. && nmakeExplain the main part of this command
-DPICO_BOARD=pico_w :It is declared that the board is the model of Pico W. If it is not declared, the default is the model of PICO, and the driver of the wifi network card will not be linked in. It can pass in cmake, but nmake will report an error that the header file cannot be found.
&& : The latter part will be executed only after the previous part is successfully executed.
Need attention This routine only provides source code. If you want to compile, please create a new project by yourself, and put the source code files into the new project.
Burning After compiling, you can generate files in formats such as .bin .hex .elf .uf2 in the build directory. Drag the .u2f in the above file to the disk recognized by Pico to burn. (Note: When programming for the first time, it is an empty code. Connect Pico W to the USB to directly identify the disk. When there is an executable program in it, you need to press and hold the BOOTSEL button before connecting to the USB)
5. Experimental phenomenon
After the program download is complete, we can see that the LED on the Raspberry Pi Pico W development board completes blinking every 5 seconds.