1、Opencv application
1、Opencv application1.1、Overview1.2、QR code1.2.1、Introduction of QR code1.2.2、QR code structure 1.2.3、QR code feature1.2.4、Create and recognize QR code1.3、Human body pose estimation1.3.1、Overview1.3.2、Principle1.3.3、Start up1.4、Target Detection1.4.1、Model structure1.4.2、About code1.4.3、Start up
1.1、Overview
OpenCV is a cross-platform computer vision and machine learning software library based on a BSD license (open source) that can run on Linux, Windows, Android and MacOS operating systems. It provides interfaces to languages such as Python, Ruby, and MATLAB, and supports many general algorithms in image processing and computer vision.
1.2、QR code
1.2.1、Introduction of QR code
QR code not only has large information capacity, high reliability, and low cost, but it can also express a variety of text information such as Chinese characters and images. It has strong confidentiality and anti-counterfeiting and is very convenient to use.
1.2.2、QR code structure
| Picture | Analyze |
|---|---|
 | Positioning markings: Indicate the direction of the QR code. |
 | Alignment markings: If the QR code is large, these additional elements help positioning. |
 | Timing pattern: Through these lines, the scanner the matrix can be can recognized. |
 | Version information: This refers to the version number of the QR code being used. There are currently 40 different versions of the QR code. The version number used in the sales industry is usually 1-7. |
 | Format information: It contains information about fault tolerance and data masking modes, and makes scanning code easier. |
 | Data and error correction keys: These modes save actual data. |
 | Quiet zone: Its role is to separate itself from other surrounding content. |
1.2.3、QR code feature
The data value in the QR code contains repeated information (redundant value). Therefore, even if up to 30% of the two-dimensional code structure is destroyed, the readability of the two-dimensional code will not be affected. The QR code has a storage space of up to 7089 digits or 4296 characters, including punctuation marks and special characters, which can be written into the QR code.
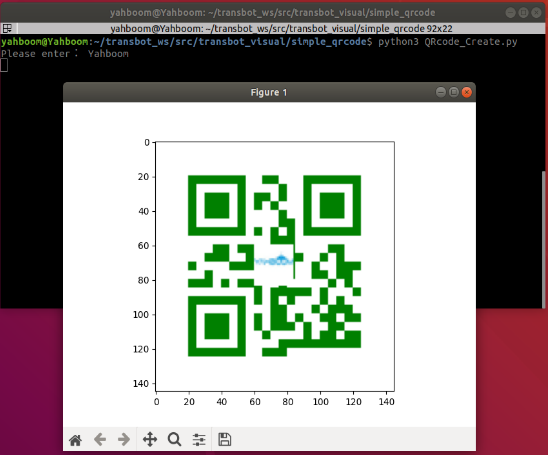
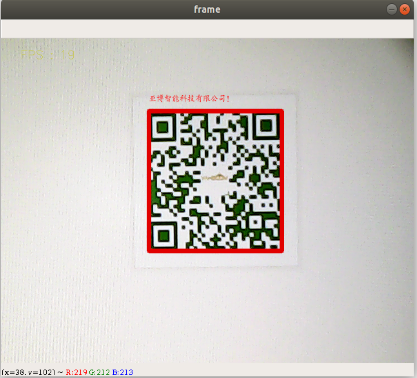
1.2.4、Create and recognize QR code
Cod path:~/transbot_ws/src/transbot_visual/simple_qrcode
Input following command to install QR code tool
python3 -m pip install qrcode pyzbarsudo apt-get install libzbar-dev
- Create
Create qrcode object
xxxxxxxxxx ''' Parameter: version: An integer ranging from 1 to 40, which controls the size of the QR code (the minimum value is 1, which is a 12×12 matrix). If you want the program to determine it automatically, set the value to None and use the fit parameter. error_correction: Control the error correction function of the QR code. The following 4 constants can be used. ERROR_CORRECT_L: About 7% or less of errors can be corrected. ERROR_CORRECT_M (default): About 15% or less of errors can be corrected. ROR_CORRECT_H: About 30% or less errors can be corrected. box_size: Control the number of pixels contained in each small grid in the QR code. border: Control the number of grids contained in the border (the distance between the QR code and the picture border) (the default is 4, which is the minimum value) ''' qr = qrcode.QRCode( version=1, error_correction=qrcode.constants.ERROR_CORRECT_H, box_size=5, border=4,)QR code to add logo
xxxxxxxxxx # If the logo address exists, add the logo picture my_file = Path(logo_path) if my_file.is_file(): img = add_logo(img, logo_path)Input python3 +.py execute file, then input the content to be generated, and press 【Enter】.
- recognize
xxxxxxxxxxdef decodeDisplay(image, font_path): gray = cv.cvtColor(image, cv.COLOR_BGR2GRAY) # convert the output Chinese characters into Unicode encoding first barcodes = pyzbar.decode(gray) for barcode in barcodes: # Extract the position of the bounding box of the QR code (x, y, w, h) = barcode.rect # Draw the bounding box of the barcode in the image cv.rectangle(image, (x, y), (x + w, y + h), (225, 0, 0), 5) encoding = 'UTF-8' # Convert to string barcodeData = barcode.data.decode(encoding) barcodeType = barcode.type # Plot the data and type on the image pilimg = Image.fromarray(image) # Create draw draw = ImageDraw.Draw(pilimg) # Parameter 1: font file path, parameter 2: font size fontStyle = ImageFont.truetype(font_path, size=12, encoding=encoding) # Parameter 1: print coordinates, parameter 2: text, parameter 3: font color, parameter 4: font draw.text((x, y - 25), str(barcode.data, encoding), fill=(255, 0, 0), font=fontStyle) # Convert PIL image to cv2 image image = cv.cvtColor(np.array(pilimg), cv.COLOR_RGB2BGR) # Print QR code data and QR code type to the terminal print("[INFO] Found {} barcode: {}".format(barcodeType, barcodeData)) return image- Phenomenon show
Input python3 +.py execute file, then input the content to be generated, and press 【Enter】.
1.3、Human body pose estimation
Cod path:~/transbot_ws/src/transbot_visual/detection
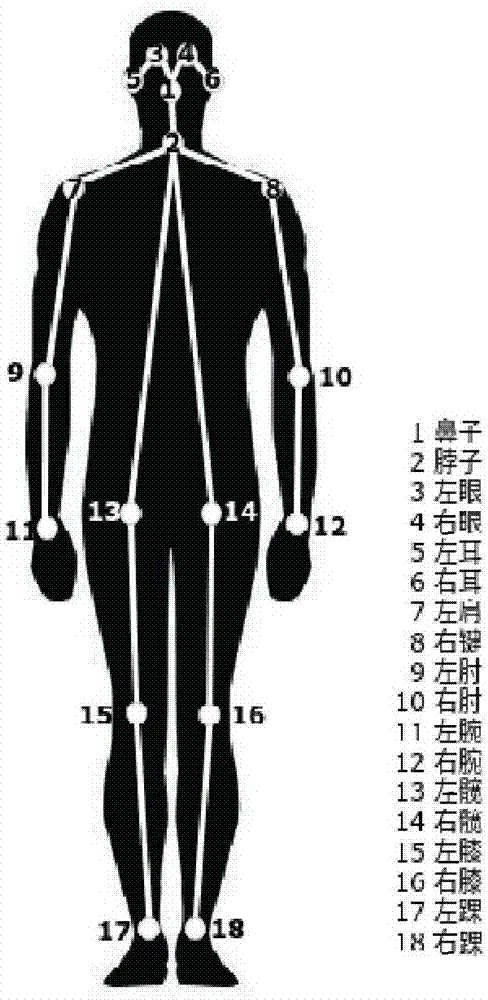
1.3.1、Overview
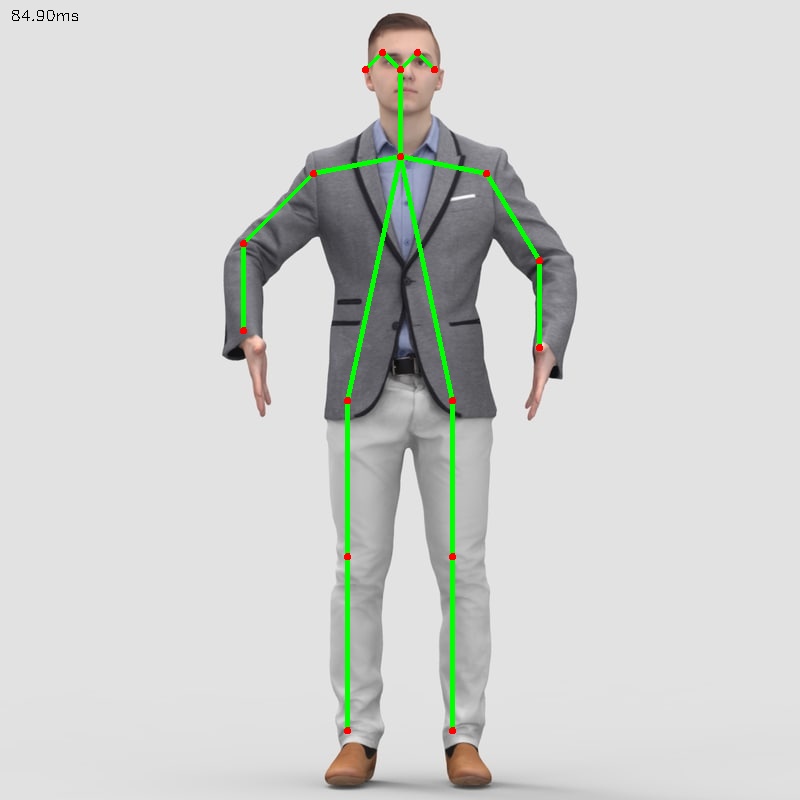
Human Posture Estimation is to estimate the posture of the human body by correctly linking the key points of the human body that have been detected in the picture. The key points of the human body usually correspond to the joints with a certain degree of freedom on the human body, such as the neck, shoulders, elbows, wrists, waist, knees, ankles, etc., as shown in the figure below.
1.3.2、Principle
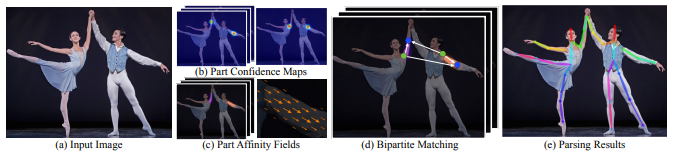
Input an image, extract the features through the convolutional network to obtain a set of feature maps, and then use the CNN network to extract Part Confidence Maps and Part Affinity Fields respectively;
1.3.3、Start up
xxxxxxxxxxcd ~/transbot_ws/src/transbot_visual/detectionpython target_detection.py
After clicking the image frame, use the keyboard【f】key to switch target detection.
xxxxxxxxxxif action == ord('f'):state = not state # Switch functionInput picture

Output picture
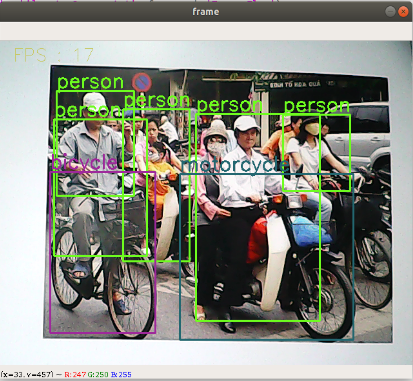
1.4、Target Detection
The main problem to be solved in this section is how to use the dnn module in OpenCV to import a trained target detection network.
We use OpenCV3.2.0 on our Transbot system.
At present, there are three main methods for using deep learning to detect objects:
- Faster R-CNNs
- You Only Look Once(YOLO)
- Single Shot Detectors(SSDs)
1.4.1、Model structure
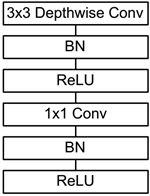
The main work of MobileNet is to replace the past standard convolutions with depthwise sparable convolutions to improve the computational efficiency and parameter amount of convolutional networks. The basic structure of depthwise separable convolution is shown in the figure below:
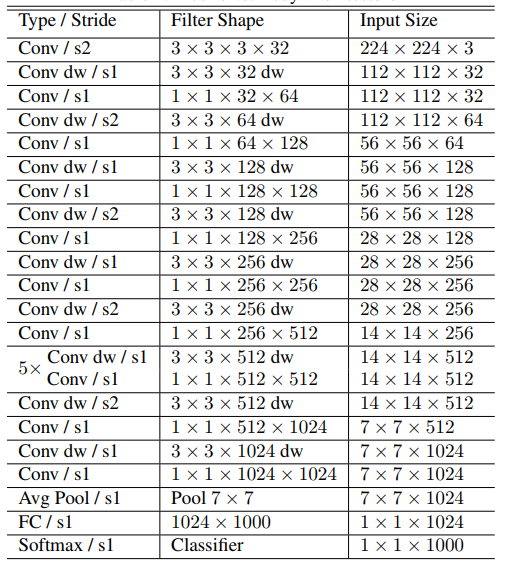
The MobileNets network is composed of many depthwise separable convolutions shown in the figure above. The specific network structure is shown in the figure below:
1.4.2、About code
List of recognizable objects
xxxxxxxxxx[person, bicycle, car, motorcycle, airplane, bus, train, truck, boat, traffic light, fire hydrant, street sign, stop sign, parking meter, bench, bird, cat, dog, horse, sheep, cow, elephant, bear, zebra, giraffe, hat, backpack, umbrella, shoe, eye glasses, handbag, tie, suitcase, frisbee, skis, snowboard, sports ball, kite, baseball bat, baseball glove, skateboard, surfboard, tennis racket, bottle, plate, wine glass, cup, fork, knife, spoon, bowl, banana, apple, sandwich, orange, broccoli, carrot, hot dog, pizza, donut, cake, chair, couch, potted plant, bed, mirror, dining table, window, desk, toilet, door, tv, laptop, mouse, remote, keyboard, cell phone, microwave, oven, toaster, sink, refrigerator, blender, book, clock, vase, scissors, teddy bear, hair drier, toothbrush]Load category [object_detection_coco.txt], import model [frozen_inference_graph.pb], specify deep learning framework [TensorFlow]
xxxxxxxxxx# Load COCO class namewith open('object_detection_coco.txt', 'r') as f: class_names = f.read().split('\n')# Display different colors for different targetsCOLORS = np.random.uniform(0, 255, size=(len(class_names), 3))# Load DNN image modelmodel = cv.dnn.readNet(model='frozen_inference_graph.pb', config='ssd_mobilenet_v2_coco.txt', framework='TensorFlow')Import the picture, extract the height and width, calculate the 300x300 pixel blob, and pass this blob to the neural network
xxxxxxxxxxdef Target_Detection(image): image_height, image_width, _ = image.shape # Create blob from image blob = cv.dnn.blobFromImage(image=image, size=(300, 300), mean=(104, 117, 123), swapRB=True) model.setInput(blob) output = model.forward() # Iterate through each test for detection in output[0, 0, :, :]: # confidence = detection[2] # When the detection confidence is higher than a certain threshold, draw the bounding box, otherwise skip if confidence > .4: # Get class id class_id = detection[1] # Map class id to class class_name = class_names[int(class_id) - 1] color = COLORS[int(class_id)] # Get bounding box coordinates box_x = detection[3] * image_width box_y = detection[4] * image_height # Get the width and height of the bounding box box_width = detection[5] * image_width box_height = detection[6] * image_height # Draw a rectangle around each detected object cv.rectangle(image, (int(box_x), int(box_y)), (int(box_width), int(box_height)), color, thickness=2) # Write the text of the class name on the detected object cv.putText(image, class_name, (int(box_x), int(box_y - 5)), cv.FONT_HERSHEY_SIMPLEX, 1, color, 2) return image1.4.3、Start up
xxxxxxxxxxcd ~/transbot_ws/src/transbot_visual/detectionpython target_detection.py
After clicking the image frame, use the keyboard【f】key to switch the human pose estimation.
xxxxxxxxxxif action == ord('f'):state = not state # 功能切换